The ODeV Idea
Last Updated October 2, 2011

Contents


  1. 1. The Idea

  2. 2. Main Components

  3. 3. The Challenge

  4. 4. Development Environment Setup

  5. 5. Eclipse Configuration

  6. i. About the Eclipse plug-in installation and update features

  7. ii. GNU ARM Eclipse Plug-in

  8. iii. Eclipse Subversive

  9. 6. The Firmware Component Architecture

  10. i. The Firmware Component Directory Structure

  11. ii. About the Component naming convention

  12. 7. The first demo application

  13. i.  The Source Code Repository

  14. 8. Microcontroller programming and application debugging

  15. i. MCU Programming

  16. ii. Application Debugging

  17. 9. Latest news


The Idea


Today the available amount of memory for embedded application is fast increasing more than the computational power. The complex peripherals embedded in a modern MCU are also increasing. This brings the firmware complexity (code size) to grow up. Many powerful and open source tools are available to address this challenge.

The Open Development Environment for embedded application (ODeV) is the next evolution of my previous Eclipse based demo projects. In the last years I used Eclipse as my default IDE for firmware development (mainly on STM32 microcontroller). I discovered many Eclipse’s powerful features and plug-ins. Now is the time to organize and share this experience.

This project is focused on the development process. It shows how to set up a powerful and flexible IDE for embedded application on Windows, Linux and Mac. Today ODeV is one of the few cross platform development environment for embedded application!


Main Components


  1. Eclipse - the open development platform. Tested with version Helios SR1 release.

  2. FreeRTOS.org - the real time scheduler. Tested with version 7.0.0.

  3. OpenOCD - the On-Chip debug solution for embedded target systems.

  4. Sourgery G++ - the C/C++ tool chain.

  5. Versaloon - the hardware interface. Tested with VesaloonMini edition.


The Challenge


Chose your Host and Develop your Embedded Multitasking Firmware.

I was able to setup my embedded development framework thanks to the work, the support and the tips of some people sharing their know-how and their effort with me. I have chosen to share these result through this web site, and I hope these few bits of code could help other people to discover the power of Eclipse and the multitasking programming.

For sure, I know that there is much work to do. To setup the environment is not a very user friendly task! Make is a powerful tool, but not all people like to manually edit their Makefile. GDB is well integrated with Eclipse, but when I suspend a debug session I can't walk the call stack of each tasks because I can inspect the running task only. Moreover the MCU peripherals registers are not supported by the register view. Each application may needs its customized tool during the development process.

Eclipse and multitasking are, once agin, the solution to the problem. The below image displays the high level design of ODeV.


The Eclipse plug-in architecture provides all needed framework to extend the Eclipse features. Versaloon and OpenOCD provide the support to a wide range of embedded MCU.

This is the scenario, and the  challenge of the ODeV idea is to integrate and to extend all these technology to make a powerful and Open Source IDE for embedded application.


Development Environment Setup


One of the interesting feature of ODeV is that it should be a cross platform tool. I have chosen each component to fulfill this requirement. Click on the below link according to your host platform to discover how to setup ODeV.

 
Windowsodev-windows.html
Macodev-mac.html
Linuxodev-linux.html

Eclipse Configuration


Note: If you have downloaded a pre-configured version of Eclipse from the Download section, you can skip this chapter.


Ok, now you have all software installed and ready to be used. The next step is to configure Eclipse and to add some useful plug-ins to the default distribution. First check the internet connection by selecting the Check for Updates command in the Help menu. If the command fails modify the network preference:

  1. Select the Preferences command from the Windows menu.

  2. The Preferences dialog is displayed.


Note (Mac): Mac OS X users can use the usual cmd + , shortcut or select the Preferences command from the Eclipse menu.


  1. On the left three view select the Network Connections subsection from the General section.

  2. On the right pane modify the network parameters according to your networks environment.

  3. Click the Ok button to close the Preferences dialog.

  4. Restart Eclipse to apply the changes.


This is the list of the needed plug-ins:

  1. GNU ARM Eclipse Plug-in - the Managed Build System.

  2. Eclipse Subversive - the SVN client.


NOTE: You can find a list of others useful plug-in in this web page.


About the Eclipse plug-in installation and update features

Eclipse provides a powerful and easy to use mechanism to install additional features. This is a three step process:

  1. To add the Update Site providing the Plug-in (tell Eclipse where to find the software).

  2. To select the Plug-in to install.

  3. To start the installation.


To install new components open the Install dialog by clicking the Install New Software command from the Help menu.


GNU ARM Eclipse Plug-in

This plug-in automate the Makefile generation and management.

  1. Click the Add button on the top right of the Install dialog to open the Add Repository dialog.

  2. Type GNU ARM Eclipse Plug-in in the Name filed (this is only a name, so choose the one you prefer).

  3. Insert the following web address in the Location field: http://gnuarmeclipse.sourceforge.net/updates.


  1. Press the OK button to confirm your choice.

  2. After a while the Install dialog displays the list of the available Plug-in.

  3. Select CDT GNU Cross Development Tools and press Next.


  1. Follow the onscreen instruction, don’t worry about (but read ;-) the warning,  and restart Eclipse when required to complete the installation.

  2. That’s all.


For more information feel free to look at the plug-in web page.


Eclipse Subversive

Working with a source control system (SCM) is always a good practice. Subversive is one of the open source SVN client well integrated within the Eclipse platform. It is also the preferred way (but not the only one) I use for easy firmware distribution. The update site is included in the Eclipse distribution, so dont’t add a new update site but selet it from the drop down list.

  1. Name:               Subversive

  2. Update Site:     http://download.eclipse.org/releases/helios

  3. Plug-in:            Subversive SVN Team Provider (Incubation)


  1. Select it from the Collaboration group

  2. Proceed with the plug-in installation as usual.

  3. This plug-in require an additional configuration step.

  4. After Eclipse restarts, you open the SVN Repository Exploring perspective from the Windows > Open Perspective > Other menu.

  5. The Subversive Connector Discovery dialog will guide you to install the missing software.

  6. If you are unfamiliar with SVN simply choose the last version of SVN Kit (1.3.2 in my case).


  1. Press Finish to confirm your choice.

  2. That’s all.


NOTE: You can find a screencast showing how to configure Eclipse in this web page.


The Firmware Component Architecture


There is another concept I need to explain before start using the IDE. It is the Firmware Component Architecture. Each part of ODeV is designed in order to make easy to build firmware in a modular way.

The target of a firmware component is to provide a set of source files exporting some features organized in a set of related tasks. But it is not only source files. A firmware component contains also all needed resource to work with ODeV.

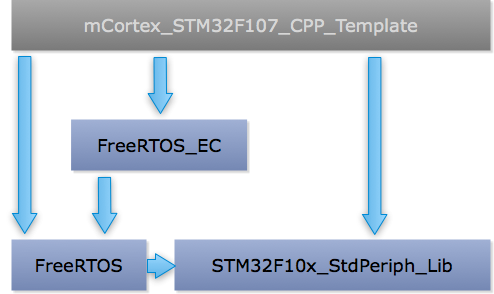
Let me show an example. Image I want to build an empty multitasking C++ application for the STM32F107 mcu, and I want to build it on a Mac host. I can split such kind of application (a template) in the following components:

  1. The ST Standard Library for STM32F107

  2. The FreeRTOS scheduler

  3. The FreeRTOS Extension Class (to provide C++ API to FreeRTOS)

  4. The Application specific files. Let me name it mCortex_STM32F107_CPP_Template


Figure 1 shows the dependence diagram of these components. An arrow from the component A to the component B specifies that the component A need the component B in order to build itself.


Fig.1 - The Components Dependence Graph

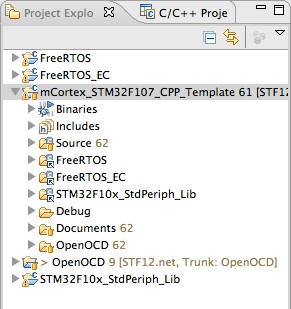
Each component is an Eclipse Project. To build with success the mCortex_STM32F107_CPP_Template project I need in the same workspace all components it depend on. Figure 2 shows the Eclipse workspace for this example.


Fig.2 - Eclipse Workspace

There are two fundamental type of components:

  1. Application Component

  2. Library Component


For example the FreeRTOS component is a Library. It is not a standalone application able to run on the MCU, but it provides the multitasking features used by all applications. On the other hand the mCortex_STM32F107_CPP_Template component is an Application.

The Firmware Component Directory Structure

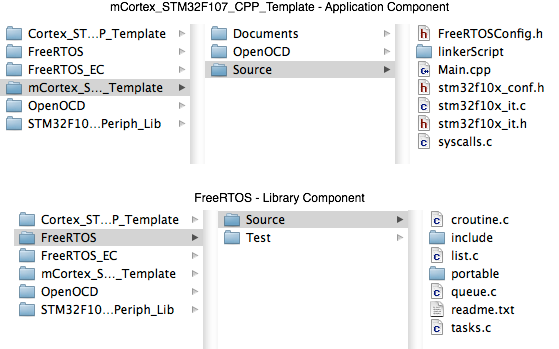
A Firmware Component has a well defined directory structure depending on its nature. Figure 3 shows the directory structure of a firmware component.


Fig.3 - Directory Structure

Each Component has a Source folder containing all source files organized in a component specific way. The following folders are specific for an Application Component:

  1. OpenOCD folder: contains all OpenOCD configuration files needed by OpenOCD to program and debug the MCU using Versaloon.

  2. Documents folder: contains the component documentation and other files.


The following folders are specific for a Library Component:

  1. Test folder: contains all file needed to compile and test the library but that are not needed by a project using the component.

  2. Documents folder: this is an optional folder. It contains components documentation and other files.


About the Component naming convention

Each component name is composed by three part:

[HOST_PLATFORM] <PROJECT_NAME> [COMPONENT_TYPE]

where

[HOST_PLATFORM] if it exists it specifies the host I used to develop the component and it is one of:

  1. l for Linux

  2. m for Mac

  3. w for Windows


<PROJECT_NAME> is the project name

[COMPONENT_TYPE] if exists it specifies the type of the component, and is one of:

  1. _Template. A template component is an empty project with a main that only perform the hardware setup and and the FreRTOS multitasking environment. It is useful to start a new project.

  2. _Demo. A demo component is a project showing how to use some features like lwIP etc.


For example the wCortex_STM32F1xx_CPP_Template is a template C++ project developed on (and ready to) Windows.


The first demo application


It is time to start using ODeV in order to work at a demo application. A good starting project is CORTEX_STM32F103. It is a porting of the standard FreeRTOS demo on the STM3210E-EVAL evaluation board. Go to the Download page, look for the CORTEX_STM32F103 project and download the project according to your host as explained in the same page.

Now you have all source code to build the application and the Project Explorer view looks like in the following picture.


Select the CORTEX_STM32F103 project and press the build button (or Project > Buid Project menu item) in order to start the build process. Check the results in the Console view.


Microcontroller programming and application debugging


NOTE: part of this documentation come from the FreeRTOS.org project. My personal thanks to Richard Berry to let me use these informations.


Eclipse cannot itself program the flash memory of a target microcontroller but does provide a convenient interface for calling whichever tool is being used for this purpose. OpenOCD is the software tool I use to drive Versaloon to program the MCU.

NOTE: if you are interested in buy Versaloon Mini please refer to the official Versaloon web page.


MCU Programming

Each Eclipse demo project includes a menu item that can be used to program the flash directly from within the Eclipse Workbench.

  1. Ensure your target hardware is connected to your host computer.

  2. Select the project to debug in the Project Explorer view

  3. Select Run > External Tools > OpenOCD Programmer (xxx) menu item as showed in the following picture according to your host.


  1. If the above specified command does not exist, use the command Run > External Tools > External Tool Configuration in order to open the External Tool Configurations dialog.

  2. Expand the Program section in the left three view to discover all configured command.


Application Debugging

Eclipse provides a graphical interface to the GDB debugger but does not itself know how to communicate with the target hardware. Usually a separate server application is required for this purpose - the server providing an interface between GDB (running on the host computer) and whichever JTAG interface device (Versaloon) is being used. To start the GDB server use the external tool Run > External Tools > OpenOCD Server (xxx). Inspect the Console view to ensure the server is started.

Now to  start a debug session:

  1. Switch to the debug perspective using the Window > Open Perspective > Debug menu item or buttons in the top right corner of the Eclipse Workbench.

  2. Select the debug server being used within the Debug window (highlighted by the red box in the picture).

  3. Click the Debug button.


That’s all.


Latest news