


Introduction
This page guides you through the needed steps to install all tools of the ODeV platform on Mac OS X:
-
‣CodeSourcery GNU toolchain - version Lite 2010.09-51.
-
‣Java Runtime Environment.
-
‣Versaloon driver.
-
‣OpenOCD - version 0.5.0 dev.
-
‣Eclipse - version Helios SR2
I tested it on Mac OS X 10.6.6 running on a Mac Intel machine. The only prerequisite is to install the Apple Developer Tool from the Apple install DVD coming with each Mac or downloading it from the Mac Dev Center.
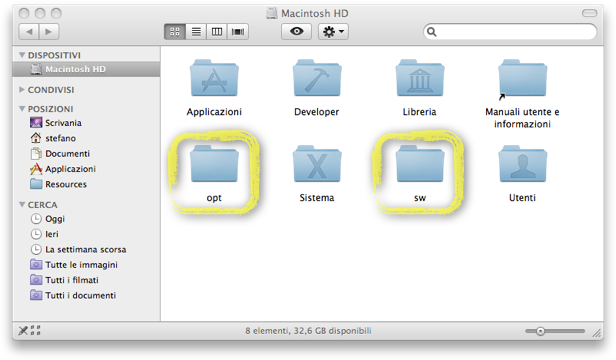
This procedure uses the UNIX side of Mac OS X to install the needed Open Source software in the system, and it is not so user friendly as the native Mac OS X software installation process. What I will do is to add two addition folders - /opt and /sw - in the root volume in order to install the software and keep it separate form the standard OS X file system structure. With this organization it is easy to isolate and track the Open Source contributions.
If you want to to hide those two folders to keep the Finder “clean” you can use the setfile command:
sudo setfile -a “V” /opt
sudo setfile -a “V” /sw
Replace the “V” attribute with the “v” one to make the folder visible again.
So, it’s time to start... open the Terminal, you have to know that it will take about half an hour to complete the procedure, and let’s go...


The ODeV Idea > ODeV - Mac OS X Setup


Eclipse Setup
To install Eclipse in your system is as easy as to download and unzip the right distribution. Before to proceed with the installation, please note that Eclipse need some additional plug-ins to be used with demo firmware published in this site. I guide you to configure Eclipse in the Eclipse Configuration section in the main project page, but, if you prefer, you can download a configured version of Eclipse from the Download section of the site (the Mac version will be available soon).
To install Eclipse follow these steps:
-
‣Download Eclipse from http://www.eclipse.org/downloads/.
-
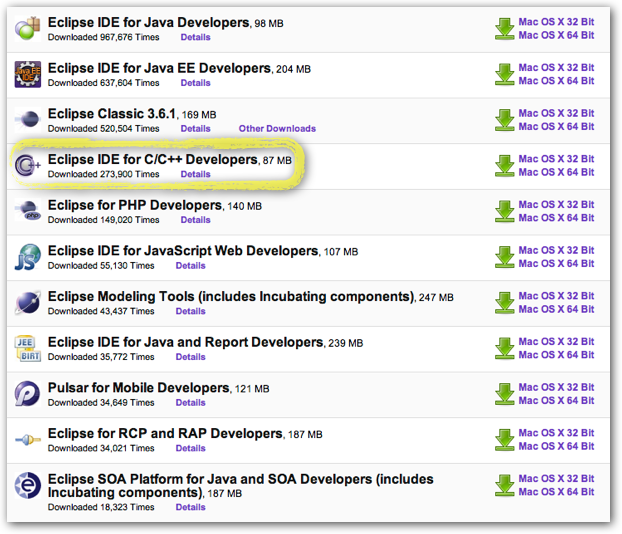
‣If you don’t known witch version to download choose the Eclipse IDE for C/C++ Developers as highlighted in the following picture.
That’s all. Now go back to configure Eclipse.
OpenOCD Setup
The latest stable release is the 0.4.0. Today it is quite old. The development release (0.5.0) add some interesting features like the SWD support for STM32 and the support to many new devices. At the moment I’m working with the 0.5.0 version because I tested it stable with all projects.
A precompiled version of OpenOCD (based on 0.5.0 version) is available in the site Download area. If you prefer to build it from source code, follow these steps.
NOTE: this is a general procedure to build an official OpenOCD distribution. To enable the SWD support I used the last patch and I have upgrade the VErsaloon firmware as explained by Simon Qian in this post.
-
‣Download the source distribution - openocd-xxx.tar.bz2 - from the official OpenOCD git server.
-
‣Extract the archive in your preferred folder.
-
‣Open Terminal and go in the OpenOCD source folder.
-
‣In the Terminal use the following command o build OpenOCD where
-
‣--prefix=<PATH> specifies the installation prefix.
> C_INCLUDE_PATH=/sw/include/
> export C_INCLUDE_PATH
> LIBRARY_PATH=/sw/lib/
> export LIBRARY_PATH
> ./configure --prefix=/opt/usr/locac --enable-vsllink
> make
> strip src/openocd
> sudo make install
That’s all.
Versaloon Setup
Once again I have to thanks Simon for his support to making Versaloon working on Mac OS X too. For more information look at the Versaloon forum web page.
OpenOCD needs libusb and libxml2 to operate with Versaloon. There are many ways to install these open source libraries. One is to use the Fink project.
Fink installation
The Fink project wants to bring the full world of Unix Open Source software to Darwin and Mac OS X. it modifies Unix software so that it compiles and runs on Mac OS X ("port" it) and make it available for download as a coherent distribution.
Tested with version 0.29.16.
To install fink in the default /sw installation folder follow those steps.
-
‣There is not currently a binary installer for Mac OS X 10.6, so you have to download and install the Fink from the source distribution. Follow the instruction provide by this Fink project web page.
-
‣You have to provide some information during the fink installation process. In most case you can simply press Enter to confirm the default choice.
-
‣That’s all.
libusb and libxml2 installation
Ok, now that you have installed Fink, to install the needed library is as easy as to type in the Terminal window the following command:
fink install libusb
fink install libxml2
Disable CDC
Some CDC kernel extensions need to be disabled in order to allow libusb to operate Versaloon:
-
‣Plug Versaloon in a USB port.
-
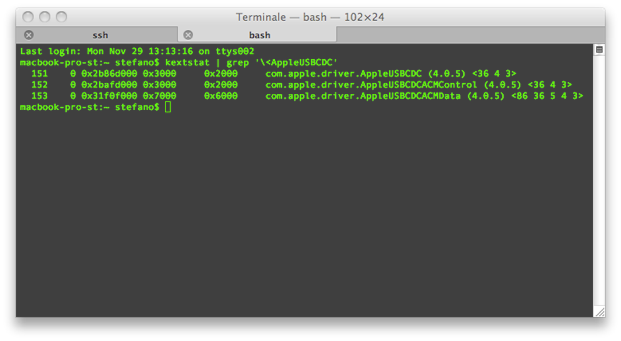
‣In the Terminal use kextstat command to find the AppleUSBCDCxxx kernel extensions loaded by the kernel.
sudo kextstat | grep '\<AppleUSBCDC'
-
‣The following picture shows the output in my case.
-
‣AppleUSBCDC
-
‣AppleUSBCDCACMControl
-
‣AppleUSBCDCACMData
-
‣Disconnect Versaloon.
-
‣In the Terminal use the kextunload command to unload the kernel extension:
sudo kextunload /System/Library/Extensions/IOUSBFamily.kext/Contents/PlugIns/AppleUSBCDC.kext
sudo kextunload /System/Library/Extensions/IOUSBFamily.kext/Contents/PlugIns/AppleUSBCDCACMControl.kext
sudo kextunload /System/Library/Extensions/IOUSBFamily.kext/Contents/PlugIns/AppleUSBCDCACMData.kext
-
‣Remember the kernel extensions you have unloaded because you may need to load it again if you use other CDC device other than Versaloon.
That’s all.
Java Setup
That’s all! :-)
Yes, at the moment Mac OS X come with a preinstalled JRE maintained by Apple.
CodeSourcery Setup
Follow the instruction in this web page. The autor made a great work!
Tested with version 2010.09-51.
Note
-
‣Download the James Snyder’s makefile from the GIT repository (to be sure to have the latest version), or using this direct link from my Download area.
-
‣Create the directory were to run the procedure and extract the archive. I install the toolchain in the /opt folder and I use /opt/CodeSourcery/buid/ as build folder. Please note that you need an Administrator account to install the toolchain in the /opt folder.

-
‣Download the Source TAR archive from the CodeSourcery web site and put it in the same folder of the Makefile as showed in the above image.
That’s all.

Copyright © 2011 Stefano Oliveri
All the code is developed for test purpose and it is unsupported. The author assumes no responsibility for any damage caused by improper uses.